
共有メールボックスはその名の通り、複数人で共有することができるメールボックスです。
共有メールボックスを2,3人で共有して使う分には手動でメンバーを登録してもよいのですが、人数が多い場合にはPowerShellで一括登録するのが簡単で間違いもないです。
Exchange Onlineに接続
まずはPowerShellを起動してExchange Onlineに接続します。
接続方法についてはこちらをご覧ください。

CSVファイルを準備
共有メールボックスに登録するユーザの一覧をCSV形式で準備します。
MailBox, UserPrincipalName
info@example.com, user1@example.com
info@example.com, user2@example.com
info@example.com, user3@example.com
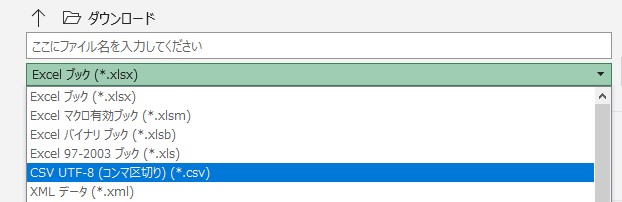
CSVファイルはUTF-8形式で保存してください。
※Excelで作成して、保存する時に「CSV UTF-8(コンマ区切り)(*.csv)」を選択
PowerShellコマンドの実行
下記の構文を環境に合わせて書き換えてください。
Import-CSV <CSVファイルフルパス> | foreach { Add-MailboxPermission -Identity $_.MailBox -User $_.UserPrincipalName -AccessRights FullAccess -Confirm: $False;Add-RecipientPermission -Identity $_.MailBox -Trustee $_.UserPrincipalName -AccessRights SendAs -Confirm: $False}
例えばCSVファイルをCドライブのTempフォルダに「CommonMailBox.csv」というファイル名で保存した場合
Import-CSV C:\Temp\CommonMailBox.csv | foreach { Add-MailboxPermission -Identity $_.MailBox -User $_.UserPrincipalName -AccessRights FullAccess -Confirm: $False;Add-RecipientPermission -Identity $_.MailBox -Trustee $_.UserPrincipalName -AccessRights SendAs -Confirm: $False}
共有メールボックスに設定したユーザを削除
逆に共有メールボックスに設定したユーザを削除する場合の方法です。
手順は同じで、削除するユーザのリストをCSVファイルで作成して、PowerShellのコマンドで削除します。
CSVファイルの形式は先ほどと同様です。
MailBox, UserPrincipalName
info@example.com, user1@example.com
info@example.com, user2@example.com
info@example.com, user3@example.com
実行するコマンドです。
Import-CSV <CSVファイルフルパス> | foreach { Remove-MailboxPermission -Identity $_.MailBox -User $_.UserPrincipalName -AccessRights FullAccess ;Remove-RecipientPermission -Identity $_.MailBox -Trustee $_.UserPrincipalName -AccessRights SendAs -Confirm: $False}
