
セキュリティグループはSharePointなどのアクセス制限を設定するのに使用します。
組織変更などでアカウントを個別に設定するのではなく、セキュリティグループを割り当てるようにすることで手間を省くことができます。
Azure ADに接続
Graph用Azure Active Directory PowerShellモジュールを使用します。
まずはPowerShellを起動してAzure ADに接続します。
接続方法についてはこちらをご覧ください。
CSVファイルを準備
セキュリティグループに登録するユーザの一覧をCSV形式で準備します。
Mailinglist, UserPrincipalName
SecurityGroupSales, user1@example.com
SecurityGroupSales, user2@example.com
SecurityGroupSales, user3@example.com
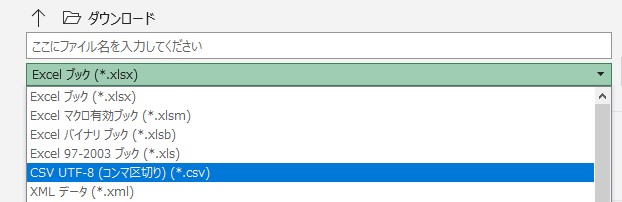
CSVファイルはUTF-8形式で保存してください。
※Excelで作成して、保存する時に「CSV UTF-8(コンマ区切り)(*.csv)」を選択
PowerShellコマンドの実行
下記の構文を環境に合わせて書き換えてください。
Import-Csv <CSVファイルフルパス> | foreach{ $tempML=$_.Mailinglist; Add-AzureADGroupMember -RefObjectId (Get-AzureADUser -ObjectID $_.UserPrincipalName).ObjectID -ObjectId (Get-AzureADGroup -Filter “DisplayName eq ‘$tempML'”).ObjectID; }
例えばCSVファイルをCドライブのTempフォルダに「SecuritySales.csv」というファイル名で保存した場合
Import-Csv C:\Temp\SecuritySales.csv | foreach{ $tempML=$_.Mailinglist; Add-AzureADGroupMember -RefObjectId (Get-AzureADUser -ObjectID $_.UserPrincipalName).ObjectID -ObjectId (Get-AzureADGroup -Filter "DisplayName eq '$tempML'").ObjectID; }セキュリティグループに設定したユーザを削除
逆に共有メールボックスに設定したユーザを削除する場合の方法です。
手順は同じで、削除するユーザのリストをCSVファイルで作成して、PowerShellのコマンドで削除します。
CSVファイルの形式は先ほどと同様です。
Mailinglist, UserPrincipalName
SecurityGroupSales, user1@example.com
SecurityGroupSales, user2@example.com
SecurityGroupSales, user3@example.com
実行するコマンドです。
Import-Csv <CSVファイルフルパス> | foreach{ $tempML=$_.Mailinglist; Remove-AzureADGroupMember -MemberId (Get-AzureADUser -ObjectID $_.UserPrincipalName).ObjectID -ObjectId (Get-AzureADGroup -Filter "DisplayName eq '$tempML'").ObjectID; }